
How to Use a Heat Press? Step by Step Guide
To use a heat press, start by gathering the necessary materials like fabric, transfer paper, and protective sheets. Choose the right design for your project and print it on suitable transfer paper. Set up your heat press on a stable, heat-resistant surface.
Adjust the temperature and timer to match your fabric and design requirements. Position the fabric and design accurately between the plates, ensuring everything’s wrinkle-free. Apply even pressure as you press. Handle the machine with care and use gloves if necessary.
Different designs and materials need specific settings for the best results. Discover more tips to perfect your craft.
What is a Heat Press?

Ever wonder how a heat press works and what it’s used for? A heat press is a versatile machine designed to transfer designs onto various materials, primarily fabrics, using heat and pressure. It’s a staple in the world of custom apparel and promotional items. If you’ve ever seen a custom t-shirt, tote bag, or cap with a graphic or logo, there’s a good chance a heat press was involved in creating that design.
You might be surprised to learn that heat presses are not just for professionals. They’re accessible to hobbyists and small business owners too. Whether you’re looking to start a custom t-shirt business or just want to create personalized gifts, a heat press can be your go-to tool. They come in various sizes and configurations, from compact models for home use to industrial-grade machines for large production runs.
Heat presses don’t just handle fabrics; they can also work with items like mugs, plates, and even puzzles, provided you have the right attachments. This versatility makes them an essential piece of equipment for anyone interested in creating custom, professional-quality designs on a wide range of items.
How Does Heat Presses Work?

A heat press works by applying a combination of heat and pressure to transfer a design onto a substrate, like fabric or ceramics. When you use a heat press, it’s all about the right balance of temperature, pressure, and timing.
These elements work together to ensure that your design adheres properly and lasts. The transfer process begins when the heat press warms up to your desired temperature. Once it’s ready, the heated platen is pressed down onto the substrate, applying even pressure over the design area.
This allows the ink or adhesive to embed into the material, creating a durable, vivid transfer.
Key components of a heat press include:
- Heated Platen: The top part that heats up and applies pressure.
- Lower Platen: The base where you place your substrate.
- Pressure Adjustment Knob: Lets you control how much force is applied.
- Timer: Ensures you’re applying heat for the correct duration.
- Temperature Control: Allows you to set the precise heat needed for your transfer.
Understanding how these components interact is essential for achieving professional results. Each material and design might require different settings, so always check your transfer paper and substrate guidelines for optimal results.
Step-By-Step Guide to Use a Heat Press Machine

To get started with your heat press, you’ll first need to select your materials and choose a design you love. Print your chosen design on transfer paper, making sure it’s ready for pressing. Next, set up the heat press and carefully position the fabric between the top and bottom plates to ensure a perfect transfer.
Select Your Materials
Choosing the right materials is crucial for achieving the best results with your heat press projects. You’ll want to ensure that the fabric and transfer materials you select are compatible with your design and the heat press machine. Different materials require different temperatures and pressure settings, so it’s essential to do your homework beforehand.
Here are some key materials to consider:
- Fabric: Cotton, polyester, and blends are popular choices. Make sure the fabric can withstand the heat and pressure without damage.
- Transfer Paper: Choose paper that matches your printer type and fabric. Inkjet and laser printers require different types of transfer paper.
- Vinyl: Heat transfer vinyl (HTV) is a great option for adding custom designs. Consider the finish you want, such as matte or glossy.
- Inks: Sublimation inks are ideal for vibrant, long-lasting prints on polyester fabrics. Ensure your ink is compatible with your printer and material.
- Protective Sheet: Teflon sheets or parchment paper can protect both your project and heat press from sticking or scorching.
Choose a Design
Once you’ve selected the right materials, it’s time to focus on choosing a design that complements your project and works well with your heat press machine. Start by considering the purpose of your project. Is it for a personal gift, a promotional item, or perhaps a custom t-shirt for an event? Your design should reflect the theme and intention behind your creation.
Next, think about the size and complexity of the design. Keep in mind that intricate patterns might require more precision and patience during the pressing process. Simpler designs are often easier to work with, especially if you’re new to using a heat press. Also, check that your chosen design fits well within the dimensions of your garment or material to avoid any awkward cropping.
Color choice is crucial too. Ensure the colors in your design contrast effectively with the base material so it stands out. You can use graphic design software like Adobe Illustrator or free alternatives like Canva to create or adapt your design.
Lastly, consider the type of transfer paper and ink you’ll be using, as they can affect the final appearance. Make sure your design is compatible with these elements for the best results.
Print Your Chosen Design on the Transfer Paper
Start by ensuring your printer is compatible with the type of transfer paper you’re using for optimal design quality. Different transfer papers are designed for specific printer types, such as inkjet or laser. Double-check your printer’s specifications before proceeding. Once compatibility is confirmed, adjust your printer settings for the best results. Here are some helpful tips to keep in mind:
- Choose High-Resolution Images: Ensure your design is of high quality to avoid pixelation when printed.
- Mirror Your Design: For designs with text or specific orientations, remember to flip the design before printing.
- Select the Right Paper Type: In your printer settings, choose the paper type that matches your transfer paper for accurate color and detail.
- Perform a Test Print: Before using transfer paper, do a test print on regular paper to check color and sizing.
- Handle with Care: Transfer paper can be delicate, so handle it carefully to prevent smudges or damage.
Once your printer is set up, load the transfer paper into the printer, ensuring the correct side faces up. Print your design, and allow the ink to dry completely before moving on to the next steps. This will ensure a clean transfer onto your fabric.
Set Up the Heat Press
To set up the heat press, first ensure you’ve placed it on a stable, heat-resistant surface to prevent accidents. This will help keep your workspace safe and efficient. Once that’s done, plug in the machine and turn on the power switch.
You’ll need to set the appropriate temperature and timer based on the type of material and design you’re using. Most heat presses have a digital display for easy adjustments.
Here’s a quick reference for common settings:
| Material | Temperature (°F) | Time (seconds) |
|---|---|---|
| Cotton | 340 | 10-15 |
| Polyester | 270 | 10-15 |
| Vinyl | 320 | 15-20 |
| Sublimation | 400 | 45-60 |
Once you’ve set the temperature, allow the machine to heat up to the desired level. It’s crucial to wait until the heat press reaches the set temperature to ensure optimal results. While waiting, prepare your transfer design and any other materials you might need.
Safety is a priority, so always handle the heat press with care, using gloves if necessary. Familiarize yourself with the heat press’s pressure adjustment knob, as you’ll need to adjust this to ensure firm contact during pressing. This setup ensures your heat press is ready for action.
Position the Fabric Between the Top and Bottom Plates
Before pressing, ensure the fabric is wrinkle-free and correctly positioned between the top and bottom plates of the heat press. A smooth surface is crucial for achieving a professional finish. Begin by laying your fabric flat on a clean, dry surface.
Gently smooth out any wrinkles with your hands or use a pre-press function if your machine has one. This step helps the design adhere evenly and avoids unwanted creases.
When positioning the fabric, keep these tips in mind:
- Center the fabric: Make sure it’s centered to avoid any off-center prints.
- Align with the plates: Ensure the fabric edges are parallel with the heat press plates for a neat result.
- Check for obstructions: Remove any debris or threads that could interfere with the transfer.
- Use a T-square: For precise alignment, especially with larger pieces, a T-square can help ensure straightness.
- Consider using heat-resistant tape: This can hold the fabric in place if you’re concerned about movement during pressing.
Once the fabric is properly positioned and secured, you’re ready to proceed to the next steps with confidence, ensuring that the base for your design is perfect.
Place Your Design on the Cloth
Once your fabric is perfectly positioned, carefully align your design on the cloth, ensuring it’s centered and straight for optimal results. Start by measuring equal distances from the edges of the fabric to the design’s edges to guarantee symmetry. You can use a ruler or measuring tape to be precise. This ensures your design appears professional and visually appealing.
Next, use heat-resistant tape to secure the design in place. This step is crucial because it prevents any movement during the pressing process, which could lead to a skewed or misaligned final product. Make sure the tape doesn’t cover any part of the design that you’re transferring, as it might interfere with the heat press’s effectiveness.
Take a moment to double-check the positioning. Stand back and view the fabric from different angles to confirm everything’s aligned as desired. Once you’re satisfied with the placement, you’re ready to proceed. Remember, taking a little extra time now to ensure perfect alignment will save you from disappointment later.
Avoid rushing through this step, as accuracy here directly influences the final appearance of your design. Proper alignment is the key to a successful and professional-looking heat transfer.
Peel the Transfer Paper
After the pressing process is complete, carefully peel the transfer paper away from the fabric to reveal your design. This step requires attention to detail, as the way you peel the paper can affect the final look of your project. Here are some key points to consider:
- Cool or Warm Peel: Check the instructions on your transfer paper. Some designs require a cool peel, while others need a warm peel. The wrong temperature can ruin your design.
- Peeling Direction: Start peeling from the corner and pull back at a consistent angle. This helps keep your design intact and prevents tearing.
- Support the Fabric: Hold the fabric steady as you peel to avoid stretching or distorting your design.
- Inspect for Flaws: As you peel, check for any areas that didn’t adhere properly. You might need to press those spots again.
- Use a Teflon Sheet: If you need to press again, cover your design with a Teflon sheet to protect it.
Peeling the transfer paper with care ensures your design looks professional and lasts. Patience and precision in this step are essential for achieving the best results with your heat press projects.
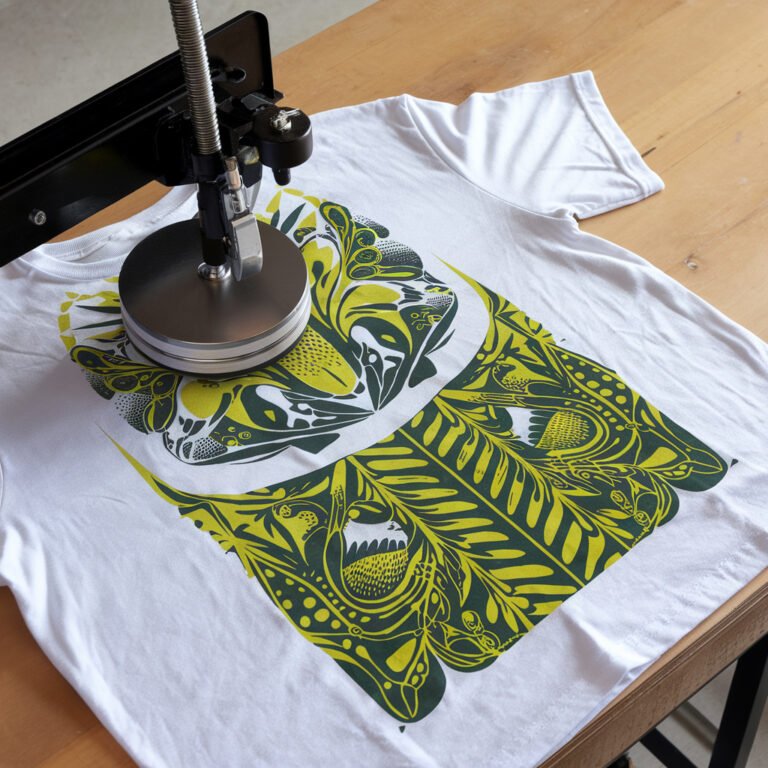
How to Use a Heat Press Machine for T-Shirts
To use a heat press machine for t-shirts, start by setting the temperature and pressure according to the material and design requirements. Each fabric type and transfer material may call for different settings, so check the manufacturer’s guidelines.
Preheat the press while preparing your t-shirt and transfer design. It’s a good idea to pre-press the t-shirt for a few seconds to eliminate any moisture and wrinkles, ensuring a smooth surface for your design.
Next, position your transfer design on the t-shirt. Ensure it’s precisely where you want it, as placement is crucial for a professional look. Once aligned, place a Teflon sheet or parchment paper over the design to protect both the transfer and the press. Lower the heat press, applying the set pressure and wait for the designated time, typically around 10-15 seconds.
After the timer goes off, carefully lift the press and remove the Teflon sheet. Let the t-shirt cool for a moment before peeling off the transfer paper, unless you’re using a cold peel transfer. Check the design to ensure it’s properly adhered. If needed, you can re-press quickly to secure the design further. Enjoy your custom t-shirt!
Frequently Asked Questions
What Materials Can Be Used With a Heat Press Machine?
You’re probably wondering what materials you can use with a heat press, right? Well, there’s quite a variety! You can press on fabrics like cotton, polyester, and blends. Vinyl and sublimation paper work great for transferring designs.
Don’t forget about canvas and some types of wood for more creative projects. Just make sure whatever you choose can withstand the heat and pressure. Always check the material’s compatibility first!
How Do I Maintain and Clean a Heat Press Machine?
To maintain and clean your heat press machine, regularly wipe down the surfaces with a damp cloth to remove any residue. Use a lint-free cloth for the platen to avoid scratches. Check and tighten any loose screws or bolts.
Lubricate moving parts as needed, following the manufacturer’s guidelines. Additionally, ensure the press is unplugged before cleaning, and don’t forget to inspect the power cord for any signs of wear.
Can I Use a Heat Press on Non-Fabric Items?
Yes, you can use a heat press on non-fabric items! It’s versatile enough for materials like ceramic, wood, and even metal. Just make sure you’re using the right transfer paper and settings for each material. For instance, mugs or tiles often need a mug press attachment.
Always check the manufacturer’s recommendations for temperature and time to avoid damaging the item. Experimenting will help you achieve the best results!
What Safety Precautions Should I Follow When Using a Heat Press?
When using a heat press, safety’s a priority. Always wear heat-resistant gloves to protect your hands. Ensure the area around the press is clear of flammable materials. Never touch the heating element directly, and keep children and pets away.
Make sure the machine’s on a stable surface and unplug it when not in use. Finally, read the user manual thoroughly for specific safety instructions related to your model.
How Do I Troubleshoot Common Heat Press Issues?
When troubleshooting common heat press issues, start by checking the temperature and pressure settings. Make sure they’re set according to the material you’re working with. If designs aren’t transferring well, confirm that the heat press is warming evenly.
For uneven prints, inspect the platen for any obstructions or residue. If you notice sticking, ensure your transfer paper is compatible. Don’t forget to regularly clean and maintain your machine for optimal performance.
Conclusion
In conclusion, using a heat press is a straightforward process once you get the hang of it. You’ve learned what a heat press is, how it works, and followed a step-by-step guide to create customized T-shirts. Remember, practice makes perfect, so don’t hesitate to experiment with different materials and designs.
With a bit of creativity and patience, you’ll be producing professional-looking results in no time. Enjoy the process and let your creativity shine through every project!
I am not sure where you’re getting your information, but great topic.
I needs to spend some time learning more or understanding more.
Thanks for wonderful information I was looking
for this information for my mission.
Wow, this piece of writing is nice, my younger sister is analyzing these kinds of things, thus I am
going to tell her.
I visited many sites except the audio feature for audio songs current
at this web page is genuinely marvelous.
whoah this blog is fantastic i really like reading your articles.
Keep up the great work! You understand, many people are searching around
for this information, you could help them greatly.
If you would like to grow your familiarity simply keep visiting this site and be updated
with the newest information posted here.